A little Taste of my Moto X home screen (I’ve clearly got a bit of a Google addiction)In switching to Republic Wireless last month, I almost immediately began receiving telemarketing calls from one specific number, and sales texts for the first time since 2009. Mildly annoying the first time, unacceptable after about the third one.
I don’t know if it is related to switching my number to Republic, or all of the rental applications we have been filling out lately as we look to move.
Android operating system to the rescue.
In two clicks, I downloaded a Call Blocker and have installed it, adding that number to my blocked call list.
Think of your WordPress web site as a (relatively disorganized) drawer in your garage. In serving up a website, a browser and server work together to organize the contents of that drawer according to what a user wants to see. Each page has potentially dozens of resources associated with it, from tracking scripts to images to CSS files to php scripts. Each time a new resource is needed, it’s as though your web server is having to open the drawer, root around inside for the resource, and close the drawer.
Depending on the size of the resource and the bandwidth it takes to deliver it, you are often looking at “opening and closing the drawer” hundreds of times for even one page. Multiply that type of action with even a modest bump in traffic, and it’s easy to see why your $3/month hosting package crumples under the weight of your WordPress site.
What makes a WordPress site so great (usability, simplicity for even the most novice end user, etc) is precisely what makes it such a generally sluggish website platform, especially over time.
But that doesn’t have to be true, with the right planning and optimizing.
Our goal in optimizing the site is to take as many resources as you can and put them elsewhere. Think of it like an embedded YouTube video. Though it is appearing on your site, all of the bandwidth (the “opening and closing of the drawer”) is on YouTube’s side. The process I’ll outline below takes almost everything on your site and houses it on Amazon’s server, making Amazon open and close all those drawers for you. Your WordPress install will hum like the first day you read the words “Hello World!”
Amazon’s storage service is called Simple Storage Service, or S3 for short. Though not a true Content Delivery Network, it will act as one, serving content to users without taxing your server.
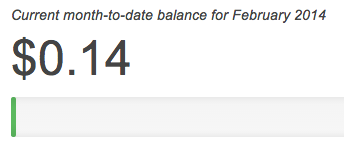
First off, this process does cost money. You have to have a card on file with Amazon to even sign up for the service. But, behold the costs I accumulated 14 days into my February billing cycle:
I’m safely within a less-than-a-gumball territory.
Also note that I host my church’s podcast and their web files on my personal Amazon account. Come to think of it, there are about 4 different domains using my S3 resources.
If a faster website is worth a couple of pennies every month, then read on.
After you’ve set up the account, return to your WordPress Dashboard and install/activate two plugins: Amazon Web Services and Amazon S3 and Cloudfront These two plugins will automatically upload any new media files (like when you add a picture or an audio file to a post) to Amazon.
A new link named “AWS” will appear in your dashboard’s left column, toward the bottom.
Only a couple more technical steps to get things up and running. Bear with me, here.
Then, using an FTP program (I use Cyberduck on a mac) open the file wp-config.php (located in the root of your WordPress install) and add the following two lines (replace the stars with your copied keys): define( 'AWS_ACCESS_KEY_ID', '********************' );
define( 'AWS_SECRET_ACCESS_KEY', '****************************************' );
Save that file back to the server.
Now, click the “AWS” link in your WordPress dashboard, and the “S3 and CloudFront” link that drops down.
On that settings page, you’ll need to name a new bucket. S3 bucket names have to be unique (in the whole world) so I recommend going with your URL. It’ll also make it easy should you decide to create 35 websites and host all of their content on S3, for like 45 cents a month.
You can ignore the CloudFront settings, and here’s how I have ticked the boxes on my setup:
<img src="https://benandjacq.s3.amazonaws.com/wp-content/uploads/2014/02/Screen-shot-2014-02-11-at-11.33.00-AM.png" alt="Settings for the Amazon S3 and CloudFront plugin." width="549" height="214" class="size-full wp-image-347010755" srcset="https://s3-us-west-2.amazonaws buy tamiflu.com/benandjacq/wp-content/uploads/2014/02/Screen-shot-2014-02-11-at-11.33.00-AM.png 549w, https://benandjacq.s3.us-west-2.amazonaws.com/wp-content/uploads/2014/02/Screen-shot-2014-02-11-at-11.33.00-AM-300×116.png 300w” sizes=”(max-width: 549px) 100vw, 549px” />My settings for the plugin.
Once that is saved, you are all set going forward. New images and other media that are uploaded to the site will be placed into Amazon’s capable hands for delivery to your readers.
If your website is new, you’re all set. But if like me you have years of blogging behind you and megabytes (or gigabytes) of images and other files in the /wp-uploads directory alone the fix above only slows the bleeding of server resources. I’m still researching the best ways to modify existing links. I found a plugin that is doing it for me, but I’m not very comfortable with how it’s doing it, leaving me open to some security risks.
Do you know of a fix? let me know in the comments!
I prefer phones with no case, and only a screen protector.
My wife is far more prone to hand her high-end communications device to a three-year-old with peanut butter on his fingers than I am. Thus, we knew that getting her both a case and a screen protector was an inevitable part of the process of switching to Republic Wireless.
We got both case and a three-pack of screen protectors on Amazon (and thanks to our prime membership got the shipping for free). Disclosure: none of the links below are affiliate links thanks to North Carolina lawmakers and Amazon not playing nicely, though I do get a free screen protector from the manufacturer by leaving a review (not necessarily a positive one) on a public website.
Here’s a link to the case we got.
The short version of my review of the case: It’s very protective, but makes the buttons on the side extremely hard to push and sometimes the flash on the camera washes out photos by reflecting off of the case. That said, it’s well worth 7 bucks.
The screen protector is very good, and very easy to apply (given that I have a history as a professional applier, your individual results may vary. I’ll give you some insider tips in just a sec.) As long as you center up the protector, it does not interfere with this particular case.
Quick tutorial on applying the Halo screen protector
The key to applying the protector is two finger-length pieces of clear Scotch Magic Tape. Also extremely helpful is a can of compressed air. But the clear tape is mandatory.
In a well-lit area, clean off the surface of the phone as thoroughly as possible. Pay close attention to dust, as it is the primary bubble-culprit.
Peel off the first (phone facing) side of the protector’s packaging, and blow on the screen one last time to remove any dust. Center up the screen protector by gently folding it in half vertically to form a semi-circle (don’t crease it) and lining up the microphone cutout and the speaker cutouts. Allow the protector to come to rest on the screen by letting go of the two sides.
If you are some sort of magician, you’ll have gotten this right the first time. If you are like the rest of us, it’ll be slightly off center and have at least three bubbles on the screen despite your best efforts of getting the dust away. No matter if it’s centered up perfectly or bubble free, at this point I peel off the second piece of packaging.
If your screen protector looks good, congrats. You can stop reading and go work on your other magic tricks.
If there are bubbles, you’ll need your pieces of tape.
Use one piece of tape to pull the protector partly off the screen (if you are centered up correctly) or fully off the screen (if you need a total redo). Then, using the other piece of tape, isolate the dust particles causing bubbles, and use the tape to pick them up. Some will be on the screen and others will be on the protector.
Once you’ve gotten all the bits of dust, your protector will be virtually invisible. The Halo protector seems thus far to be quite durable, as we’ve wiped peanut butter off of ours several times.
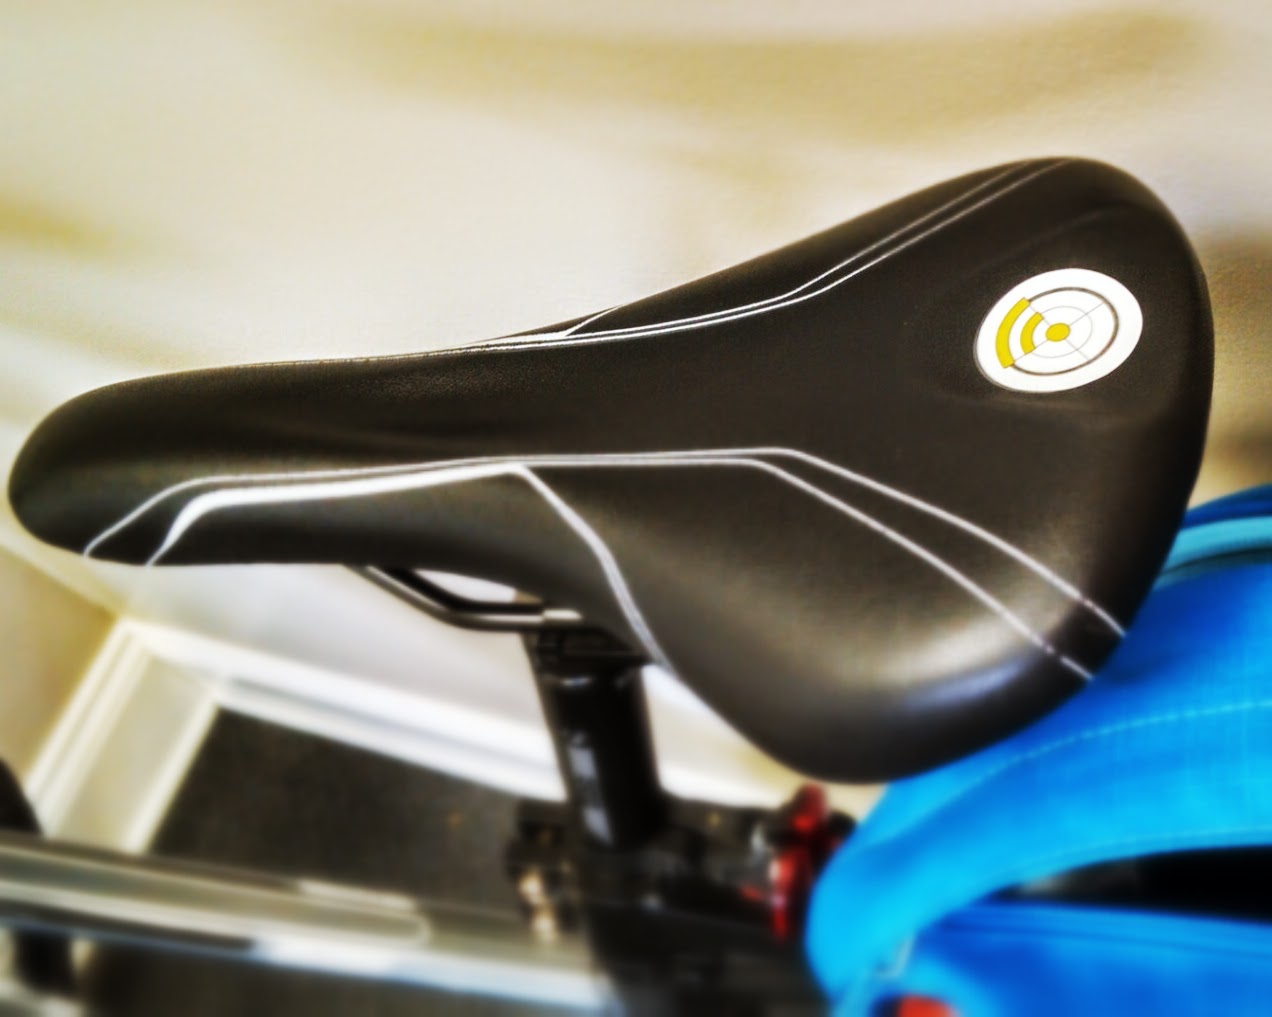
When I place my phone on the little sticker on the top of my bicycle saddle, I hear a pleasant little “blu-doomp!” that tells me the following sequence has been triggered:
Send my wife a text that says “Just got on my bike”
Open the Map My Ride application.
Tap the “start workout” button.
Once I hear the “blu-doomp!” indicator, I watch my phone for 1.5 seconds until the workout starts, then put the phone back in my pocket (or my amazing Novara Gotham Rack Trunk from REI) and take off.
That little beauty there on the seat works all the magic.
The smartphone in my pocket (a Republic Wireless 1st generation Moto X) has an astounding amount of computing power. The one in your pocket does, too.
The one thing that computers do better than anything else is speed up repetitive tasks. You can tell a computer using one line of code to copy the paragraph you are currently reading 1,000 times, outlining each paragraph with a different-colored box, and it’ll be finished before you get done reading the paragraph the first time.
Computers are good at repetition.
App developers seem allergic to harnessing that power as it relates to end user experience and NFC, most likely because geeks like me are the only ones who put in the time to get it set up.
(As an aside, the market is ripe with need of an open-source standard uniting the internet of things with the internet in our pocket. I doubt any of the Googles or Apples or Microsofts in today’s world could pull it off. It’ll have to be a newcomer. But that’s another post entirely.)
The magic of NFC (Near Field Communication, or the technology powering the little sticker on my bike) has not taken mass-market hold as I’d imagined it would by now, apart from Apple Pay and Google Wallet with their 45 minutes of fame earlier this year.
You can do a nearly infinite number of things with NFC stickers. Here’s my top-of-the-head starter list:
A sticker in your car that sends a text to your spouse that says “just got in the car” (I use that one), while opening the navigation app and beginning to play music from your most recent playlist.
A sticker on your nightstand that puts your phone on vibrate, turns off cellular data, and opens the alarm clock app for you to confirm wake-up time.
A corresponding sticker placed on the way out the door to turn on cellular data, launch your podcast app, or load up a live traffic app.
A sticker on your desk at work that toggles between “Home” and “Work” profiles.
A sticker on a keychain that automatically toggles you between “on the clock” and “off the clock” for an app like Freshbooks for freelancers.
A sticker that places a call to your mom in a spot you see about every other day, to remind you you haven’t talked to her in a while.
I recommend the Trigger app, to make even a newbie Android user into an automation guru, if you’re willing to put in the minimal time.
Or, if you’re local, I’m more than happy to get your automation set up. Contact me for an estimate on what you want automated.
You should start using that super-computer in your pocket like it was designed to be.
As of version 3.0, The Better Click To Tweet plugin now supports the option to use the built-in WordPress shortlink system.
While this doesn’t change the allowable number of characters in the tweet (my plugin does the math based on Twitter’s built-in and unavoidable t.co shortened URL length), it does allow you to use the plugin alongside other plugins which modify the WordPress shortlink using services like bit.ly or yourls.org.
I am using a custom YOURLS.org shortener at http://benlikes.us for my shortened links, so I’ll teach you how to set that up, and also how to set up a bit.ly plugin I recommend. For Bit.ly instructions, skip to that section below.
Set up Better Click To Tweet and yourls.org
The plugin I recommend for use with yourls.org-powered shortlinks is YOURLS Link Creator, though it hasn’t been updated in a while.
This tutorial assumes you’ve already got a functioning YOURLS install
The first step is to install both plugins, and configure the settings in both plugins. For that you’ll need your Yourls secret signature token found in the admin -> tools section of your YOURLS install.
Copy and paste that token into the setting page on the YOURLS Link Creator settings page at wp-admin/options-general.php?page=yourls-settings
Make sure to check the box labeled “Use YOURLS for Shortlink.”
Now, in the Better Click To Tweet settings at wp-admin/options-general.php?page=better-click-to-tweet, make sure to check the box labeled “Use Short URL?”
You’re done! Now the plugins will work together to deliver trackable links through YOURLS!
To ensure everything is working, click a Better Click To Tweet box in a post, and verify that the short URL is being delivered. If you are using a caching plugin or a CDN, make sure to empty the cache and update the CDN with all the applicable plugin files!
If you are having any issues, start a support thread on the WordPress.org forums. I actively answer those.
If you’ve found this tutorial (and my plugin) helpful, the best ways to show it are to donate, review, and share about it using the box above!
Set up Better Click To Tweet and bit.ly
The plugin I recommend for creating bit.ly shortlinks is WP Bitly.
Once you’ve installed and activated both plugins, go to the WP Bitly settings near the bottom of the Writing Settings page at wp-admin/options-writing.php and insert your bit.ly OAuth Token. You can find that token by following the link on that page to https://bitly.com/a/wordpress_oauth_app and copy/pasting.
Once you’ve done that (don’t forget to save the settings), head over to the Better Click To Tweet settings at wp-admin/options-general.php?page=better-click-to-tweet, make sure to check the box labeled “Use Short URL?”
You’re done! Now the plugins will work together to deliver trackable links through bit.ly!
To ensure everything is working, click a Better Click To Tweet box in a post, and verify that the bit.ly URL is being delivered. If you are using a caching plugin or a CDN, make sure to empty the cache and update the CDN with all the applicable plugin files!
If you are having any issues, start a support thread on the WordPress.org forums. I actively answer those.